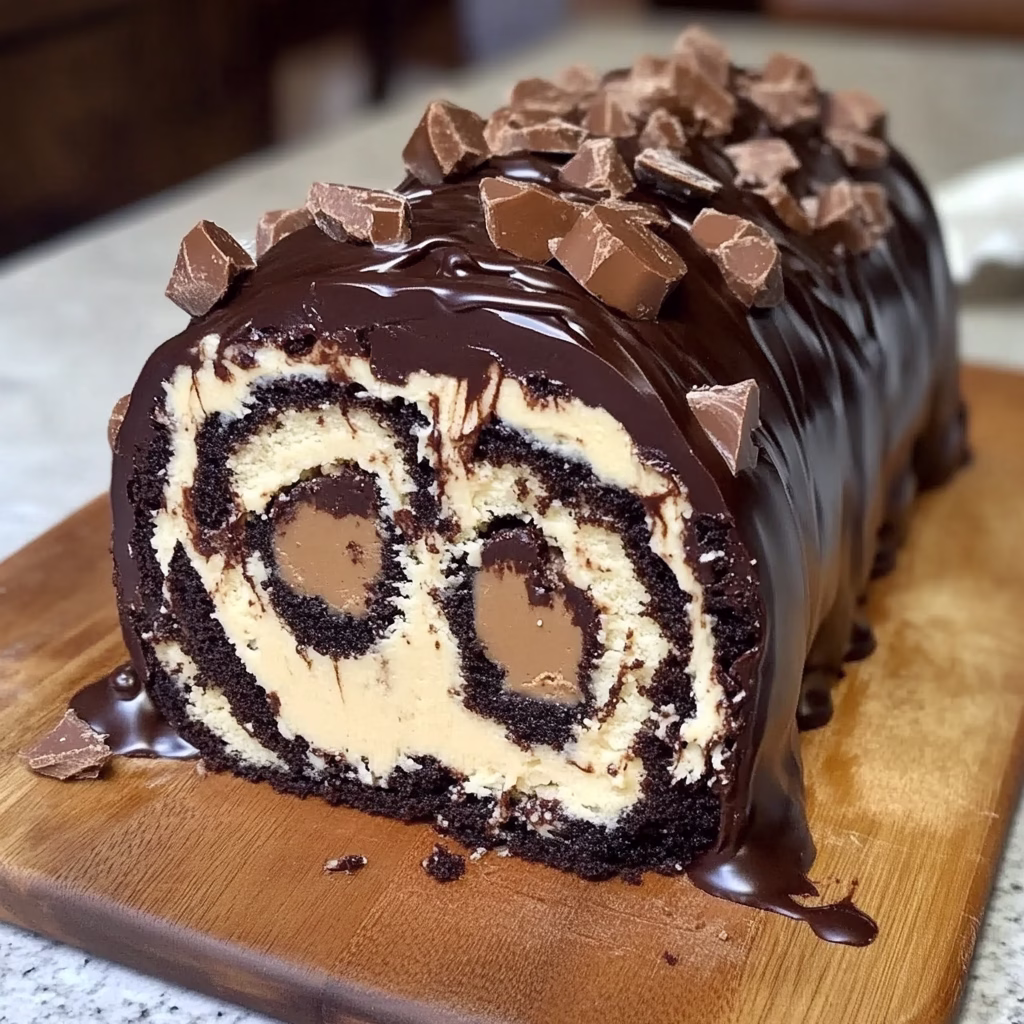
Let me start by saying this: if you’re a fan of peanut butter cups, soft chocolate cake, and desserts that make you do a little happy dance after the first bite, this is your recipe. This cake isn’t just sweet—it’s rich, creamy, soft, and a little bit indulgent in the best way. It’s the kind of dessert that makes people ask, “Where did you get this from?” and you get to say, “I made it.” Trust me, you’re going to love how it turns out.
I made this cake on a weekend when I needed a little something to brighten the mood. I was thinking about my favorite candy—yep, Reese’s peanut butter cups—and I wondered, “What if I turned that into a roll cake?” Something light and fluffy on the outside, creamy and rich on the inside, and just packed with that perfect chocolate-peanut butter combo. I gave it a try, and oh wow, it came out so good. Since then, it’s become my go-to dessert for birthdays, movie nights, or just when I want to impress people without spending hours in the kitchen.
It might look fancy, but I promise you—it’s actually very easy to make. You don’t need to be a professional baker. Just take it step by step, follow your gut (and this recipe), and you’ll end up with something amazing.
Why This Cake Always Gets Rave Reviews
It’s rich but not too sweet. The cake itself is light and soft, while the filling is creamy and full of peanut butter flavor. And then there’s the ganache—that glossy chocolate layer that melts into every bite. Honestly, it tastes like a giant peanut butter cup, but even better because it’s homemade.
And people love how beautiful it looks when you slice it. The swirl inside always gets a few “oohs” and “aahs.” It’s that perfect mix of simple and impressive.

What You’ll Need to Make This Peanut Butter Cup Chocolate Roll Cake
This recipe is made with everyday ingredients. If you’ve got cocoa powder, peanut butter, and a few baking basics, you’re already halfway there.
For the chocolate sponge cake:
¾ cup (90g) all-purpose flour
½ cup (50g) unsweetened cocoa powder
1 tsp baking powder
½ tsp salt
5 large eggs (room temperature)
¾ cup (150g) granulated sugar
1 tsp vanilla extract
2 tbsp vegetable oil
¼ cup (60ml) milk
For the peanut butter cream filling:
1 cup (250g) creamy peanut butter
½ cup (115g) unsalted butter, softened
1 ½ cups (180g) powdered sugar
2–3 tbsp heavy cream (for smoothing)
A pinch of salt
For the topping:
½ cup (120ml) heavy cream
1 cup (170g) semi-sweet chocolate chips
Crushed peanut butter cups (for decoration)
How to Make This Cake at Home—Step by Step
Bake the chocolate sponge
Start by preheating your oven to 175°C (350°F). Line a 10×15 inch jelly roll pan (or any shallow baking sheet with sides) with parchment paper. Make sure it hangs over the sides a little—it helps lift the cake later. In a bowl, whisk together the flour, cocoa powder, baking powder, and salt. In another large bowl, beat the eggs and sugar until the mixture becomes thick, pale, and fluffy—this takes about 5 to 6 minutes. Gently mix in the vanilla, oil, and milk. Then, slowly fold in your dry ingredients. Be careful not to deflate the batter. Pour it into your prepared pan, spread it evenly, and bake for 10–12 minutes or until the cake springs back when you touch it.
Roll it while it’s warm
As soon as the cake is out of the oven, place a clean kitchen towel on your counter and dust it with powdered sugar. Carefully flip the hot cake onto the towel and gently peel off the parchment. Starting from one short end, roll the cake up with the towel and all. Let it cool completely like this. Rolling it while warm helps it keep that beautiful roll shape later without cracking.
Make the peanut butter filling
In a bowl, beat the peanut butter and softened butter together until creamy and smooth. Add powdered sugar and a pinch of salt, then beat again. Add a tablespoon or two of cream to help loosen it up until it’s soft and spreadable but not runny. It should feel like frosting.
Unroll and fill
Once the cake is cool, carefully unroll it. Spread your peanut butter filling evenly over the surface, all the way to the edges. Gently roll it back up, this time without the towel. Wrap it in plastic wrap and refrigerate for at least an hour—it helps it firm up and hold its shape.
Top it off with ganache
Heat your heavy cream until it’s just simmering, then pour it over the chocolate chips. Let it sit for a minute or two, then stir until smooth and glossy. Let the ganache cool slightly before pouring it over your cake roll. Use a spoon to spread it evenly. Top with chopped peanut butter cups for that extra wow factor.
A Few Tips for a Perfect Roll Every Time
Use room temperature eggs
They whip up more easily and hold more air, giving you that light and spongey texture.
Don’t skip the rolling step
Rolling the cake while it’s still warm is the key to preventing cracks later.
Chill before serving
This cake slices beautifully after it’s had time to chill. Plus, the flavors deepen as it rests.
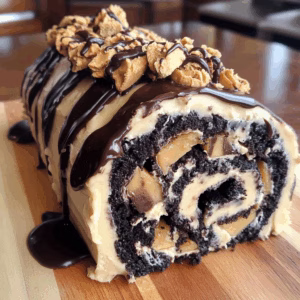
Decorate as you like
You can keep it simple or go big—more peanut butter cups, chopped nuts, a drizzle of caramel… whatever you love.
More Recipes:
- Delightful Raspberry Swirl Shortbread Cookies You’ll Want to Bake Every Weekend!
- One Pan Cajun Dirty Orzo You’ll Keep Coming Back To!
- Lemon Vinaigrette Recipe: A Little Jar of Sunshine for Your Salad
- Healthy Greek Chicken Bowls That Taste Like a Vacation
- Brown Sugar Shaken Espresso Overnight Oats You’ll Dream About
- Country Fried Chicken 🍗✨: Crispy, Juicy, and Absolutely Worth the Mess
- Grilled Chicken and Broccoli Bowls: Creamy, Cozy, and Packed with Flavor

How to Store It
Keep the cake in the fridge, tightly wrapped, for up to 4 days. It actually gets better with time. You can also freeze it—just slice it and wrap the pieces individually, then thaw in the fridge when you’re ready for a treat.
Peanut Butter Cup Chocolate Roll Cake
Ingredients
For the chocolate sponge cake
- ¾ cup 90g all-purpose flour
- ½ cup 50g unsweetened cocoa powder
- 1 tsp baking powder
- ½ tsp salt
- 5 large eggs room temperature
- ¾ cup 150g granulated sugar
- 1 tsp vanilla extract
- 2 tbsp vegetable oil
- ¼ cup 60ml milk
For the peanut butter cream filling
- 1 cup 250g creamy peanut butter
- ½ cup 115g unsalted butter, softened
- 1 ½ cups 180g powdered sugar
- 2 –3 tbsp heavy cream
- A pinch of salt
For the chocolate ganache topping
- ½ cup 120ml heavy cream
- 1 cup 170g semi-sweet chocolate chips
- Crushed peanut butter cups for decoration
Instructions
- Preheat your oven to 175°C (350°F) and line a 10×15-inch jelly roll pan with parchment paper, leaving overhang on the sides.
- In a medium bowl, whisk the flour, cocoa powder, baking powder, and salt.
- In a large bowl, beat the eggs and sugar together until thick, pale, and tripled in volume. Mix in the vanilla extract, oil, and milk gently.
- Fold in the dry ingredients carefully to avoid deflating the batter. Pour the batter into the pan, spread evenly, and bake for 10–12 minutes or until it springs back when touched.
- Lay a clean kitchen towel on the counter and dust it with powdered sugar. Turn the hot cake onto the towel, peel off the parchment paper, and roll it up tightly with the towel. Let it cool completely.
- To make the filling, beat the peanut butter and butter together until smooth. Add powdered sugar and salt, and beat again. Add cream a tablespoon at a time until it’s fluffy and spreadable.
- Unroll the cooled cake gently and spread the peanut butter filling evenly to the edges. Roll it back up without the towel and wrap tightly in plastic wrap. Refrigerate for at least 1 hour.
- Heat the cream until simmering and pour it over the chocolate chips. Let it sit for 1–2 minutes, then stir to make a smooth ganache. Cool slightly before pouring it over the cake.
- Decorate the top with crushed peanut butter cups and chill for 15 minutes before slicing and serving.
Notes
- Eggs at room temp help the sponge rise properly.
- Ganache can be made ahead and reheated gently if needed.
- Storage: Refrigerate for up to 4 days, or freeze slices for up to 2 months.