I have to admit something: I’m a huge fan of anything crunchy, cheesy, and a little spicy. That’s exactly why Beef and Cheese Chimichangas stole my heart the first time I tried them. These golden-fried (or baked!) tortillas stuffed with savory beef and melty cheese feel like a party in every bite. They’re crispy on the outside, gooey inside, and downright comforting. Today, I’ll walk you through how to make them step by step, share my best tips, fun twists you can try, and even a bit of history so you can appreciate every mouthful. Ready to roll? Let’s get cooking!
What You’ll Need to Make Beef and Cheese Chimichangas
Gather your ingredients and tools before you start. Having everything ready will make the process smooth and fun.
Ingredients
- 1 pound ground beef (85% lean)
- 1 small onion, finely chopped
- 2 cloves garlic, minced
- 1 teaspoon chili powder
- 1 teaspoon ground cumin
- ½ teaspoon smoked paprika
- Salt and pepper, to taste
- 8 large flour tortillas (10–12 inches)
- 2 cups shredded Mexican cheese blend (cheddar, Monterey Jack, etc.)
- ½ cup salsa or enchilada sauce (plus extra for serving)
- 2 tablespoons chopped fresh cilantro (optional)
- Oil for frying (vegetable or canola) or nonstick spray for baking
Equipment
- Large skillet or frying pan
- Wooden spoon or spatula
- Plate lined with paper towels
- Baking sheet (if you choose to bake)
- Tongs or long spatula
- Measuring spoons and cups
I like to have everything at arm’s reach because once the beef is cooked, things move fast.
Why You’ll Love These Chimichangas
Crispy Meets Cheesy
Imagine biting into a golden tortilla that cracks just right, giving way to warm, seasoned beef and gooey strands of cheese. It’s that contrast of textures that makes chimichangas so irresistible.
Customizable and Fun
You can make them as mild or as spicy as you like. I often sneak in some chopped jalapeño or a dash of hot sauce if I’m feeling bold. You can use ground turkey, shredded chicken, or even black beans instead of beef.
Party-Perfect Finger Food
Chimichangas are easy to pick up and dip, making them a hit at game nights, casual dinners, or backyard barbecues. Kids and adults alike love them.
Make-Ahead Friendly
You can assemble them ahead of time, keep them covered in the fridge, and fry or bake just before serving. That means less last-minute rush and more time with your guests.
How to Make Beef and Cheese Chimichangas
I break it down into five simple steps. Follow along, and you’ll be rolling chimichangas like a pro.
Step 1: Prepare the Beef Filling
- Heat your skillet over medium-high heat. Add the ground beef and break it up with your spoon.
- When the beef starts to brown, add the chopped onion. Cook until the onion is soft, about 3–4 minutes.
- Stir in the minced garlic, chili powder, cumin, smoked paprika, salt, and pepper. Cook for another minute, until the spices are fragrant.
- Pour in the salsa or enchilada sauce. Stir to combine, then remove the skillet from heat.
- Taste and adjust seasoning. If you like more heat, add a pinch of cayenne or a few dashes of hot sauce.
This filling is savory, slightly spicy, and ready to melt that cheese.
Step 2: Warm the Tortillas
- To prevent tearing, warm each flour tortilla for about 10 seconds on each side in a dry skillet or in the microwave (wrapped in a damp paper towel).
- Stack them on a plate and cover with a clean kitchen towel to keep them soft and pliable.
Warming makes rolling so much easier and keeps the tortillas from cracking.
Step 3: Fill and Roll the Chimichangas
- Lay a warm tortilla flat on your work surface.
- Spoon about ⅓ to ½ cup of the beef mixture into the center.
- Sprinkle ¼ cup shredded cheese over the beef. If you like cilantro, add a tablespoon now.
- Fold in the sides of the tortilla toward the center.
- Roll the tortilla tightly from the top down, keeping the fillings inside. Tuck the ends underneath so the chimichanga stays closed.
Keep a little water on hand to moisten the edge of the tortilla—it acts like glue and helps seal the roll.
Step 4: Fry or Bake the Chimichangas
To Fry (for extra crispiness):
- In a heavy skillet, pour enough oil for a ½-inch depth. Heat over medium-high until it reaches 350°F (or a small piece of tortilla sizzles immediately).
- Carefully place the rolled chimichangas seam side down in the hot oil. Cook in batches—don’t crowd the pan.
- Fry each side for 2–3 minutes, turning gently with tongs or a spatula, until golden brown and crispy all over.
- Transfer to the paper towel–lined plate to drain.
To Bake (for a lighter option):
- Preheat your oven to 425°F (220°C).
- Place the chimichangas seam side down on a baking sheet.
- Brush or spray each one lightly with oil.
- Bake for 15–20 minutes, flipping halfway, until they’re golden and crisp.
I love frying for the deepest crunch, but baking works great when I want something lighter.
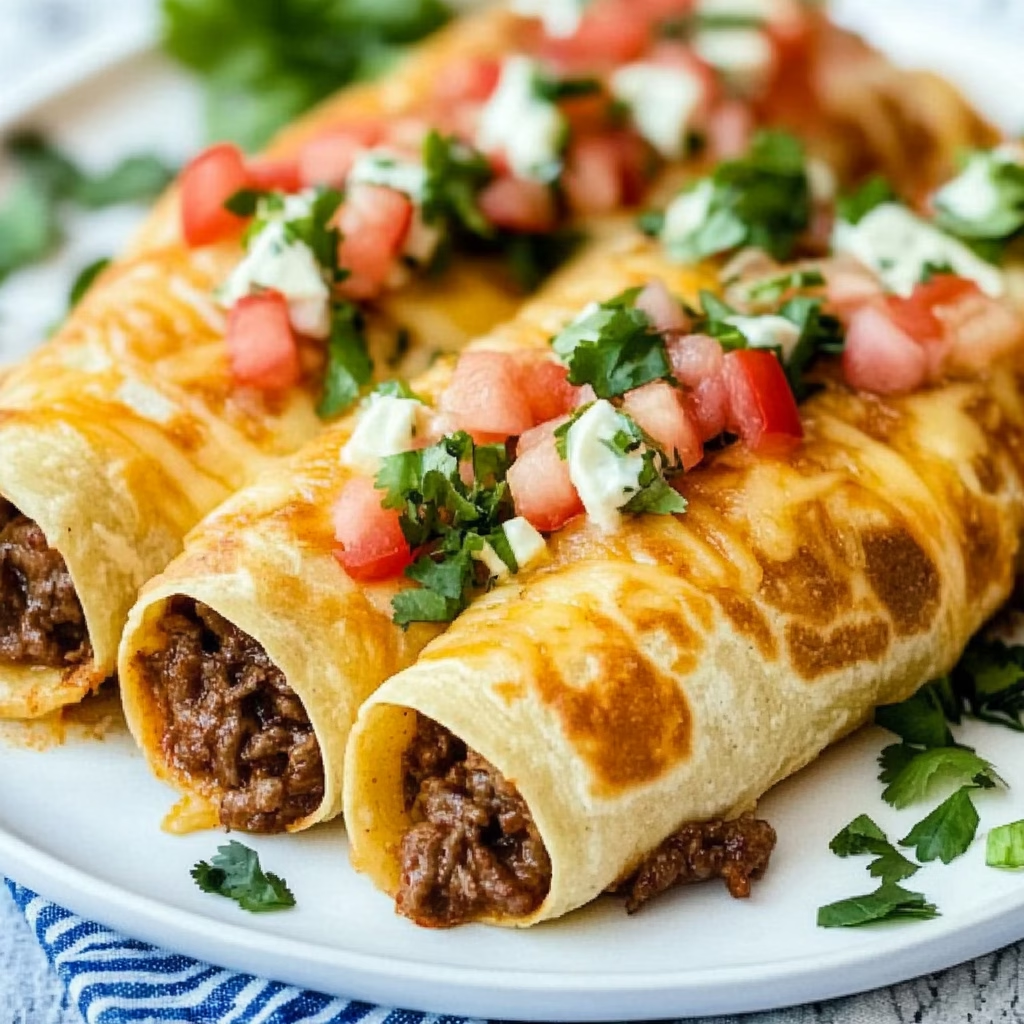
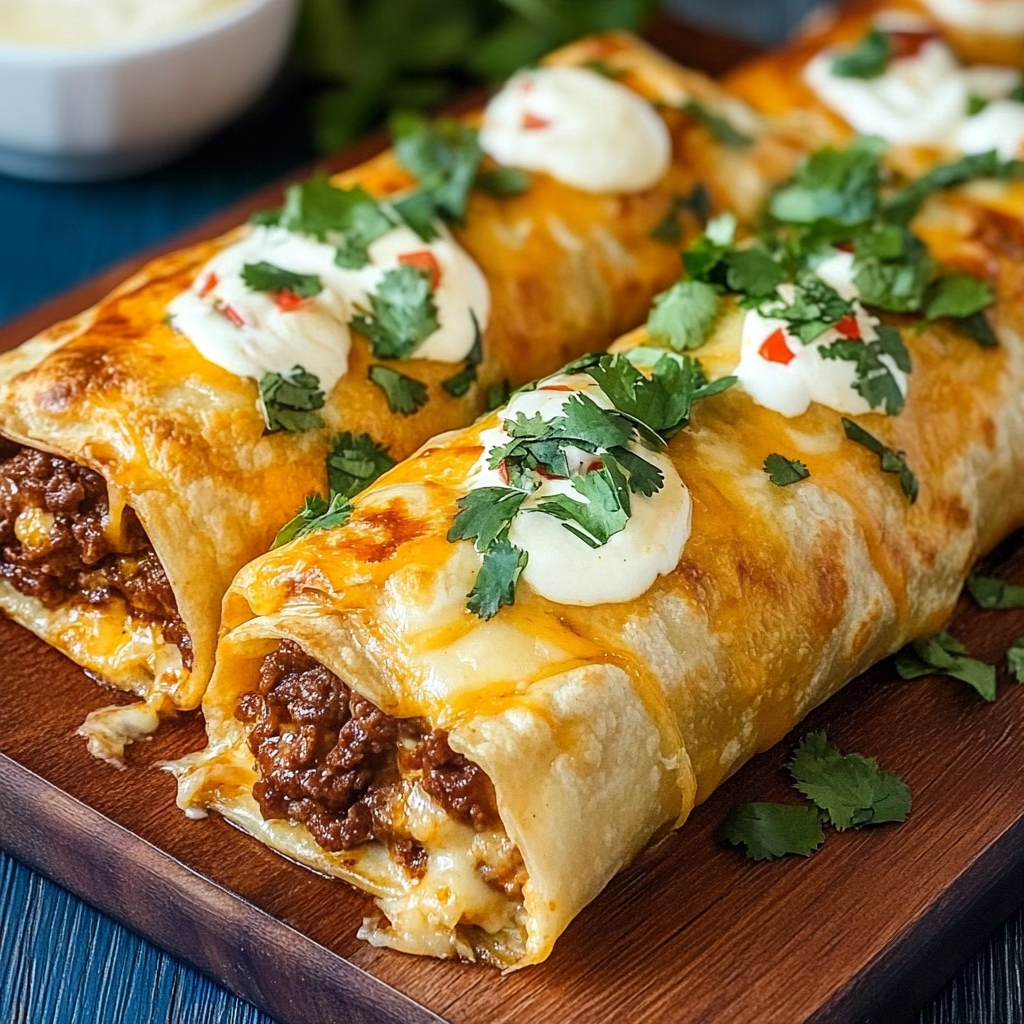
Step 5: Add Toppings and Serve
- Transfer your chimichangas to a serving platter.
- Spoon extra salsa or enchilada sauce over the top if you like them saucy.
- Drizzle with sour cream or a tangy crema.
- Sprinkle chopped cilantro, sliced green onions, or diced tomatoes for freshness.
- Serve with lime wedges on the side for a citrusy pop.
Dig in while they’re hot and crispy—you’ll thank me.
More Recipes:
- Delightful Raspberry Swirl Shortbread Cookies You’ll Want to Bake Every Weekend!
- One Pan Cajun Dirty Orzo You’ll Keep Coming Back To!
- Lemon Vinaigrette Recipe: A Little Jar of Sunshine for Your Salad
- Healthy Greek Chicken Bowls That Taste Like a Vacation
- Brown Sugar Shaken Espresso Overnight Oats You’ll Dream About
- Country Fried Chicken 🍗✨: Crispy, Juicy, and Absolutely Worth the Mess
- Grilled Chicken and Broccoli Bowls: Creamy, Cozy, and Packed with Flavor
My Top Tips for Perfect Chimichangas
Don’t Overfill Your Tortillas
Too much filling makes rolling tricky and can cause the tortilla to burst during cooking. Aim for a neat, centered mound.
Keep the Oil Hot (But Not Smoking)
If the oil is too cool, chimichangas soak up oil and get greasy. Too hot, and they brown on the outside before heating through. Aim for a gentle sizzle.
Seal the Seams Well
A dab of water or an egg wash on the edge before rolling helps seal the tortilla so the filling stays put.
Let Them Rest Briefly
After frying or baking, let chimichangas rest for a minute. This gives the cheese inside a moment to set so it doesn’t ooze out everywhere.
Trial Batch
If it’s your first time, make one or two as a test. That way you can adjust heat or cooking time before committing the whole batch.
Fun Variations You Can Try
Chicken and Cheese
Swap the beef for shredded rotisserie chicken. Add a teaspoon of taco seasoning for extra flavor.
Vegetarian Black Bean Chimichangas
Use seasoned black beans (cooked with onion, garlic, cumin, and chili powder) and add roasted corn and diced bell peppers.
BBQ Beef Chimichangas
Toss your cooked ground beef with barbecue sauce, add shredded cheese, and top with crispy fried onions after cooking.
Buffalo Chicken Chimichangas
Mix shredded chicken with buffalo sauce, fill the tortillas, and after cooking, drizzle ranch dressing and sprinkle blue cheese crumbles.
Breakfast Chimichangas
Fill with scrambled eggs, breakfast sausage or bacon, cheese, and diced potatoes. Serve with salsa or hot sauce for brunch.
How to Serve and Store Your Chimichangas
Serving Suggestions
- Plate them with Mexican rice and refried beans for a full meal.
- Offer a range of salsas—mild, pico de gallo, and a smoky chipotle.
- Include cooling sides like guacamole, sliced avocado, or a simple cabbage slaw.
Storage Tips
- Refrigerator: Keep leftovers in an airtight container for up to 3 days. Reheat in a 375°F oven for 10 minutes or in an air fryer for 5 minutes to restore crispiness.
- Freezer: Freeze uncooked, rolled chimichangas on a tray until firm, then transfer to a freezer bag for up to 1 month. Cook from frozen, adding a few extra minutes to your frying or baking time.
FAQs About Beef and Cheese Chimichangas
Can I Make These Ahead for a Party?
Yes! Assemble them, cover, and store in the fridge a few hours ahead. Cook just before guests arrive.
What Tortillas Work Best?
Large (10–12 inch) flour tortillas are ideal. Corn tortillas tear more easily and aren’t as flexible.
How Do I Reheat for Best Crunch?
Use an air fryer or oven rather than a microwave. Microwaves make the tortilla soggy.
Can I Use Ground Turkey or Chicken?
Absolutely. Adjust the seasonings—turkey and chicken are milder, so you may want to increase the spices.
Is It Safe to Freeze and Fry Later?
Yes, just brush them with a little oil and fry or bake from frozen, adding a few extra minutes to cook through.
A Bit of History: Why Chimichangas Are a Fiesta Favorite
Legend has it that chimichangas were born in Arizona in the 1920s or 1950s—accounts vary—when a cook accidentally dropped a burrito into hot oil and exclaimed a certain Spanish word. Ever since, that happy accident turned into a beloved dish throughout the Southwest. While burritos stay warm, chimichangas go for a crispy, indulgent twist. Today, you’ll find them in Tex-Mex restaurants everywhere, each chef adding their own spin with fillings and sauces.
Final Thoughts: Share the Fiesta
I hope you’re as excited as I am to make these Beef and Cheese Chimichangas. They’re the perfect mix of crunchy and cheesy comfort, and they bring a festive vibe to any meal. Whether you fry or bake them, fill them with beef or go veggie, these chimichangas are guaranteed to become a favorite. So gather your tortillas, cook that beef, roll ‘em up, and get ready for a crispy, gooey fiesta in every bite. Enjoy!

Crunchy Beef and Cheese Chimichangas
Ingredients
- 1 pound ground beef 85% lean
- 1 small onion finely chopped
- 2 cloves garlic minced
- 1 teaspoon chili powder
- 1 teaspoon ground cumin
- ½ teaspoon smoked paprika
- Salt and pepper to taste
- 8 large flour tortillas 10–12 inches
- 2 cups shredded Mexican cheese blend cheddar, Monterey Jack, etc.
- ½ cup salsa or enchilada sauce plus extra for serving
- 2 tablespoons chopped fresh cilantro optional
- Oil for frying vegetable or canola or nonstick spray for baking
Instructions
- Heat a skillet over medium-high heat. Add ground beef and break it apart with a spoon.
- When the beef starts to brown, add chopped onion and cook until soft (about 3–4 minutes).
- Stir in minced garlic, chili powder, cumin, smoked paprika, salt, and pepper. Cook for another minute.
- Add salsa or enchilada sauce, stir to combine, and remove from heat. Taste and adjust seasoning if necessary.
- Warm each tortilla for 10 seconds on each side in a dry skillet or microwave. Stack them and cover with a kitchen towel to keep warm.
- Place a warm tortilla on a surface, then spoon about ⅓ to ½ cup of the beef mixture in the center. Add ¼ cup of cheese and a tablespoon of cilantro (optional).
- Fold the sides of the tortilla towards the center and roll tightly from top to bottom, sealing the ends with a little water.
- To fry: Heat oil in a heavy skillet to 350°F. Fry chimichangas for 2–3 minutes on each side until golden brown.
- To bake: Preheat the oven to 425°F. Arrange chimichangas on a baking sheet and bake for 15–20 minutes, flipping halfway through.
- Once cooked, serve with salsa, sour cream, or crema, and sprinkle with fresh cilantro or green onions.
Notes
- Make sure not to overfill the tortillas to prevent bursting during cooking.
- If you prefer lighter chimichangas, opt for baking instead of frying.
- For added heat, you can incorporate chopped jalapeños or a dash of hot sauce into the beef mixture.
- Store leftovers in the fridge for up to 3 days or freeze them for up to 1 month. Reheat in an oven or air fryer for the best results.