Hey you! Yeah, you—the one staring at that fancy restaurant menu, thinking, “I wish I could make Chicken Katsu at home without burning the kitchen down.” Guess what? You can! This isn’t just any fried chicken—this is Authentic Japanese Chicken Katsu, with a golden, crunchy crust, tender juicy meat, and a flavor that’ll make you say “arigato” to yourself. No fancy tools, no weird ingredients, and definitely no deep-fryer required. I’ve messed this up so many times (RIP, my first charcoal-like attempt) that I’ve mastered the foolproof method. Let’s do this!
Why You’ll Obsess Over Authentic Japanese Chicken Katsu
- Crispy Outside, Juicy Inside – That katsu crunch is life-changing. Imagine biting into a cloud… if clouds were fried and delicious.
- 15-Minute Magic – Faster than ordering takeout! (And cheaper than a plane ticket to Tokyo.)
- Kid-Approved – Even picky eaters beg for seconds. My nephew calls it “Japanese chicken nuggets” and licks the plate.
- Meal Prep Hero – Leftovers make killer sandwiches, salads, or curry bases.
- No Special Skills Needed – If you can pound a chicken and dip stuff in breadcrumbs, you’re a katsu master.
True Story: My neighbor, Dave (who once microwaved cereal), nailed this recipe on his first try. Now he hosts “Katsu Fridays.” You’re next.
What You Need for Authentic Japanese Chicken Katsu
(Serves 4 hungry humans or 2 very ambitious ones)
- 4 boneless, skinless chicken thighs (or breasts, but thighs = juicier!)
- 1 cup all-purpose flour
- 2 large eggs
- 2 cups panko breadcrumbs (must be panko—regular crumbs won’t crunch!)
- Salt & pepper
- 1 tsp garlic powder (optional, but adds umami)
- Neutral oil for frying (vegetable, canola, or sunflower)
For Authentic Katsu Sauce (DIY Hack):
- 3 tbsp ketchup
- 2 tbsp Worcestershire sauce
- 1 tbsp soy sauce
- 1 tsp sugar (or honey)
- 1 tsp mustard (optional)
Substitutions for Lazy Days:
- No panko? Crush unsweetened cornflakes or pork rinds.
- Vegan? Use tofu or eggplant slices!
- Gluten-free? Swap flour for rice flour, panko for GF crumbs.
Step-by-Step: Foolproof Authentic Japanese Chicken Katsu
1. Prep the Chicken
- Place thighs between plastic wrap or parchment paper.
- Pound to ½-inch thickness using a rolling pin, skillet, or wrath. (Cathartic, right?)
- Season both sides with salt, pepper, and garlic powder.
2. Set Up Your “Katsu Station”
- Bowl 1: Flour (mix in a pinch of salt).
- Bowl 2: Whisked eggs (add a splash of water for thinner coating).
- Bowl 3: Panko (press crumbs down to flatten them—trust me).
3. Bread Like a Pro
- Dip chicken in flour → shake off excess.
- Dunk in egg → let drip slightly.
- Press into panko, coating every nook. Pretend it’s a tiny chicken armor.
4. Fry to Golden Perfection
- Heat ½ inch oil in a pan (medium heat). Test with a breadcrumb—it should sizzle gently.
- Fry chicken 3-4 mins per side until golden. Don’t crowd the pan!
- Drain on a wire rack (not paper towels—keeps it crispy!).
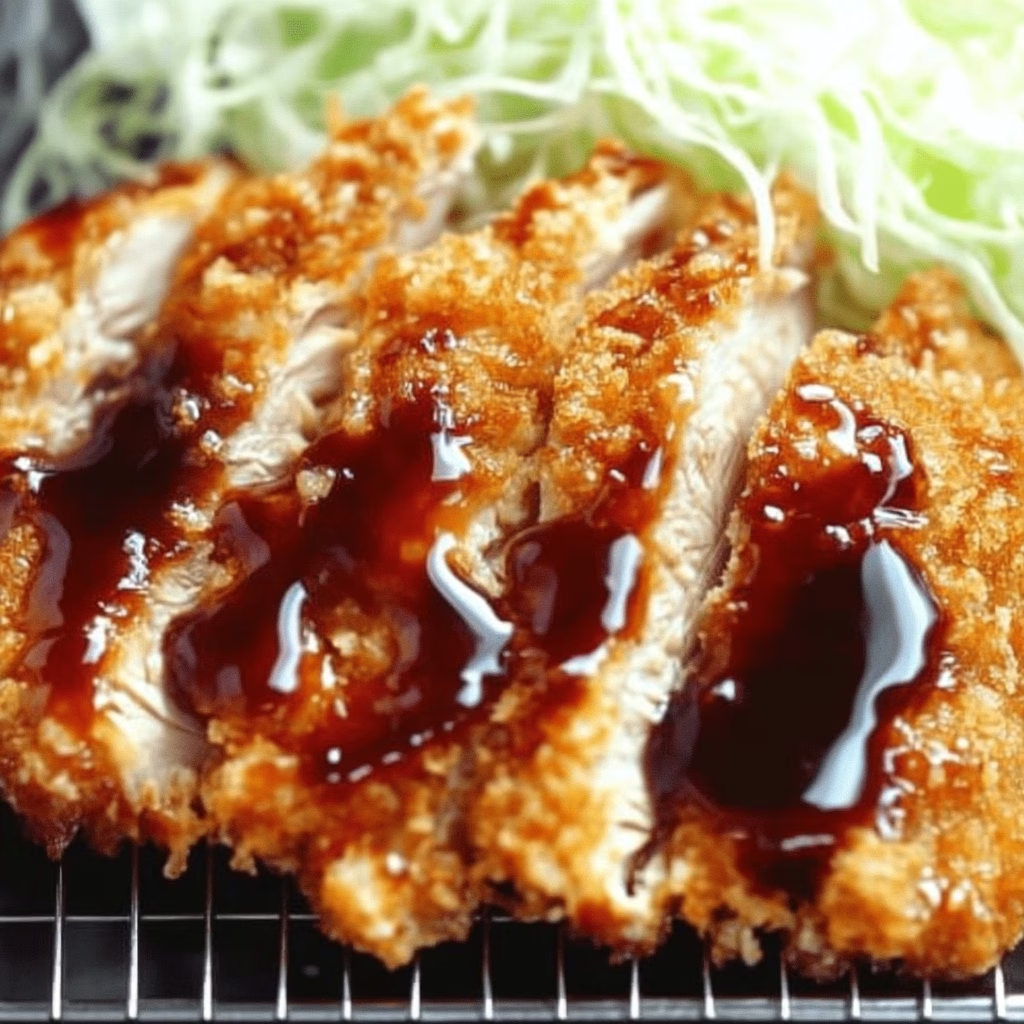
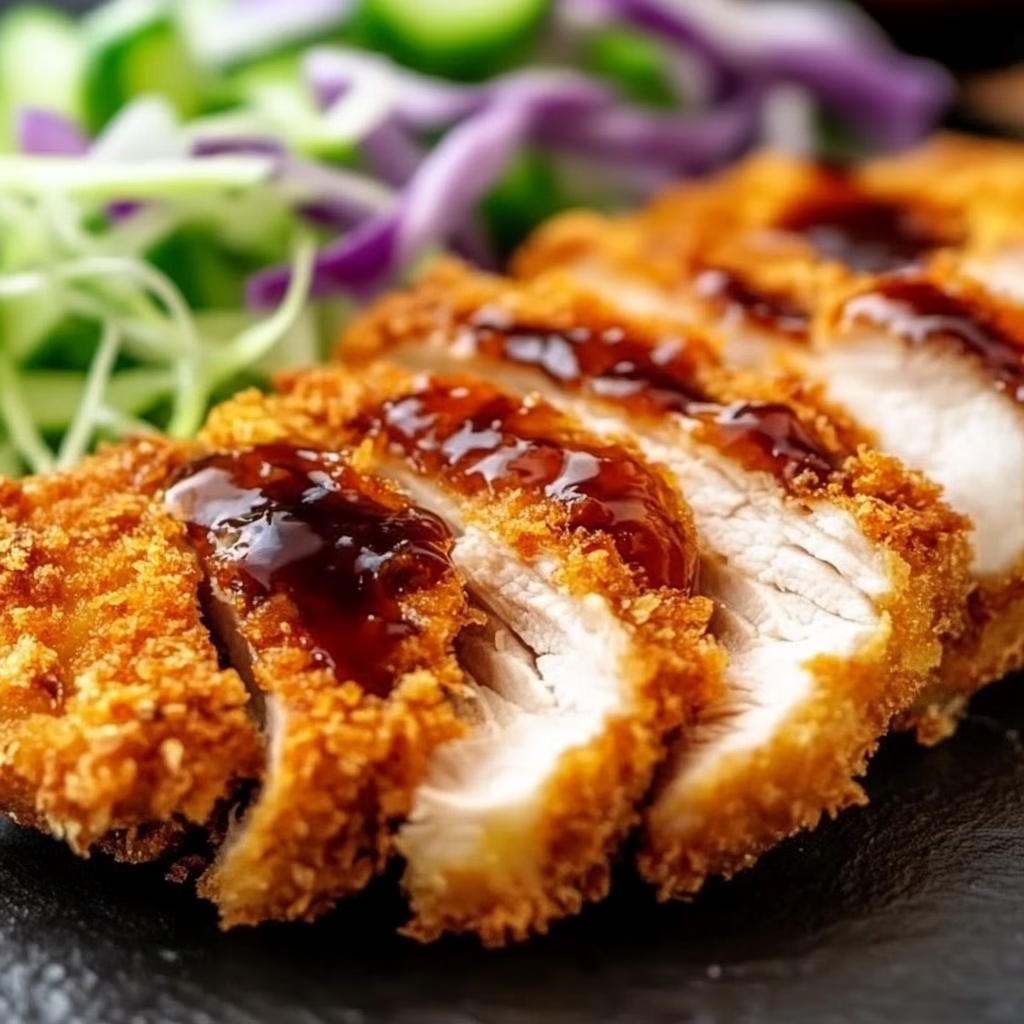
5. Slice & Serve
- Rest 2 mins, then slice into strips.
- Drizzle with katsu sauce, serve with shredded cabbage, rice, and a lemon wedge.
More Recipes:
- Homemade Reese’s Cups: How I Beat My Candy Bar Addiction (And Burned My Thumb with Chocolate)
- Gordon Ramsay’s Chicken Sandwich: How I Finally Nailed the Crispy, Juicy Perfection (After Burning 3 Batches)
- Fiery Chicken Ramen with Creamy Garlic Sauce: How I Survived College (and My Spicy Obsession) with a Bowl of Noodles
- Valentine Chocolate Covered Strawberries: How I Nailed the Perfect Romantic Treat
- Homemade Reese’s Cups: How I Beat My Candy Bar Addiction (And Burned My Thumb with Chocolate)
- High Protein Creamy Beef Pasta: How I Learned to Stop Eating Sad Chicken and Love Carbs (Without Guilt)
- Greek Turkey Meatballs with Tzatziki: How My Big Fat Greek Vacation Inspired My Go-To Weeknight Miracle
7 Secrets for the Best Authentic Japanese Chicken Katsu
- Double-Dip for Extra Crunch: For obsessives: Dip in egg → panko → egg → panko again.
- Bake for Health Nerds: Spray breaded chicken with oil, bake at 400°F (200°C) for 20 mins.
- Keep It Crispy: Place fried katsu on a wire rack, not paper towels. Soggy bottoms = sad katsu.
- Freeze for Later: Freeze breaded raw chicken. Fry straight from freezer (add 2 mins per side).
- Sauce Upgrade: Add grated apple or a dash of ginger to your DIY sauce.
- Leftover Hack: Chop into katsu curry, sandwiches, or sushi rolls.
- Kid-Friendly Fun: Use cookie cutters for mini katsu shapes.
FAQs (Because I’ve Burned, Undercooked, and Learned the Hard Way)
Q: Can I use chicken breasts?
A: Sure, but thighs stay juicier. Breasts dry out faster—marinate in milk first!
Q: Why is my katsu soggy?
A: Oil wasn’t hot enough, overcrowded pan, or you used soggy crumbs. Panko is key!
Q: What’s the difference between katsu and schnitzel?
A: Katsu uses panko (lighter crunch) and is served with tangy sauce. Schnitzel = finer crumbs, lemon.
Q: How to store leftovers?
A: Fridge (3 days) or freeze (2 months). Reheat in oven or air fryer—never microwave!
Q: Best oil for frying?
A: Neutral oils with high smoke points: canola, vegetable, or peanut oil.
The History of Chicken Katsu (Because Food Nerds Love Trivia)
Chicken Katsu (tori katsu) is Japan’s take on Western-style fried chicken, inspired by Portuguese traders in the 19th century. Originally made with pork (tonkatsu), chicken became popular post-WWII as a cheaper alternative. Today, it’s a comfort food staple—served in bento boxes, atop curry, or with a mountain of cabbage. Fun fact: In Japan, katsu is a pun for “to win” (katsu = 勝つ)—students eat it before exams for luck!
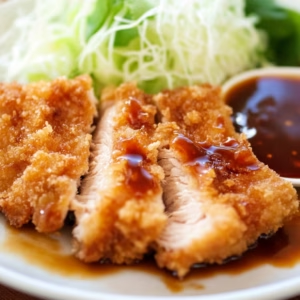
How to Serve Authentic Japanese Chicken Katsu
- Classic Style: Shredded cabbage, steamed rice, miso soup, and katsu sauce.
- Katsu Curry: Smother in Japanese curry sauce with carrots and potatoes.
- Katsu Sando: Layer between soft milk bread with tonkatsu sauce and cabbage.
- Breakfast Twist: Top with a fried egg and drizzle with spicy mayo.
Final Tip: You’ve Got This!
The first time I made Authentic Japanese Chicken Katsu, I forgot to pound the chicken. It cooked unevenly, and I cried into my soy sauce. Now? I’m the “Katsu Queen” of my block. Remember:
- Pound evenly → no raw spots.
- Hot oil → crispy, not greasy.
- Rest before slicing → keeps juices in.
Now go forth, fry fearlessly, and tag me in your katsu pics! 🐔✨
Authentic Japanese Chicken Katsu
Ingredients
For the Chicken Katsu:
- 4 boneless skinless chicken thighs (or breasts)
- 1 cup all-purpose flour
- 2 large eggs
- 2 cups panko breadcrumbs
- 1 tsp garlic powder optional
- Salt & pepper to taste
- Neutral oil for frying vegetable, canola, or sunflower
For the Katsu Sauce:
- 3 tbsp ketchup
- 2 tbsp Worcestershire sauce
- 1 tbsp soy sauce
- 1 tsp sugar or honey
- 1 tsp mustard optional
Instructions
Prepare the Chicken:
- Place chicken thighs between plastic wrap and pound to ½-inch thickness.
- Season with salt, pepper, and garlic powder.
Set Up Breading Station:
- Bowl 1: Flour with a pinch of salt.
- Bowl 2: Whisk eggs with a splash of water.
- Bowl 3: Panko breadcrumbs.
Bread the Chicken:
- Coat chicken in flour, then egg, then press into panko until fully covered.
Fry the Chicken:
- Heat ½ inch of oil in a pan over medium heat.
- Fry chicken 3-4 minutes per side until golden and crispy.
- Drain on a wire rack.
Make the Katsu Sauce:
- Mix ketchup, Worcestershire sauce, soy sauce, sugar, and mustard in a small bowl.
Serve:
- Slice chicken into strips, drizzle with katsu sauce.
- Pair with rice, shredded cabbage, and a lemon wedge.
Notes
- Air Fryer Option: Cook at 200°C (400°F) for 15 minutes, flipping halfway.
- Baking Alternative: Bake at 200°C (400°F) for 20 minutes, or until golden.
- Storage Tips:
- Refrigerate leftovers for up to 3 days.
- Freeze breaded, uncooked chicken for up to 2 months.
- Reheat in the oven or air fryer to maintain crispiness.


s8zm5o
KKsTUS zKXHtIX nZh YBBGNfgp EAnZUs YlEC
v6ats6